This guide commences with outlining the configuration of your Franka robot arm. Following this we detail the configuration of the Oculus Quest. We then outline the software setup for the NUC which interfaces directly with the Franka control unit and finally the laptop which runs the GUI application and client software.
Table of contents
Configuring the Franka robot
Franka World Account
A Franka World account is used to manage Franka robot arms and associated firmware updates. You may login to Franka World or register and account at the following portal.
Thankfully Franka Robotics have provided a tutorial on registering and synchronizing software for your Franka robot on Franka World. Please follow this tutorial to set up your robot arm:
Importantly, after the above tutorial, it is necessary to ensure that the Franka Control Interface (FCI) feature is installed on your robot. Further information on this interface which Franka Robotics expose is found in the guide below:
Operating the Robot
Please refer to the Franka Robotics Getting Started Guide to perform the initial setup and operation of your robot arm. At this point it is worthwhile noting the details of how to activate and deactivate FCI for your robot, these details can be found here.
Updating Inertia Parameters for Robotiq Gripper
In order to accurately represent the robot model with the Robotiq gripper we need to update the end-effector configuration. From the Desk UI you may access this option under Settings > End-Effector as outlined here.
Please add the following configuration file via the UI.
Configuring the Oculus Quest
The Oculus will be used to run an application that tracks the pose of hand-held controllers which we use to teleoperate the robot.
The first step to setting up your Oculus Quest is to associate a Meta account with the device. You may create an account at the following portal. Once you’ve created a Meta account you also need to register as a Meta developer, a guide for accomplishing this can be found here.
Once you have a meta developer account, you are ready to begin enabling developer mode on your Oculus device. Developer mode is required to run a custom application for the Oculus Quest which we use as part of the DROID platform. For instructions on enabling developer mode on your Oculus device please see the following guide.
Later in this guide we will detail how to run the required application on the Oculus, for now the device setup is complete.
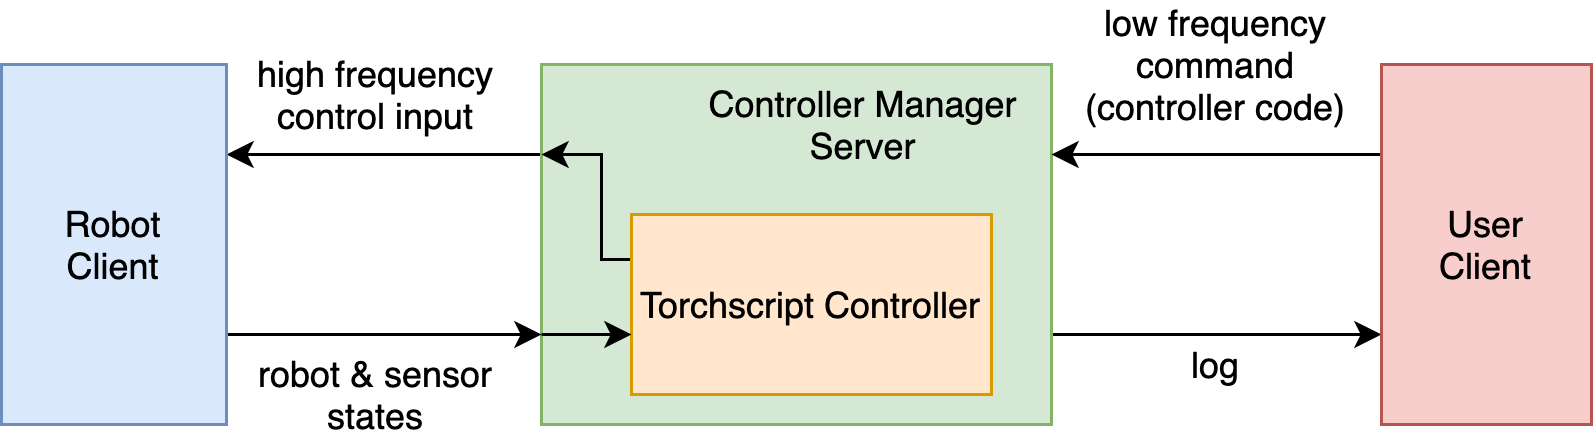
Configuring the NUC
The NUC device is used to run the polymetis controller manager server. This server manages translating commands from the user client to the robot client. A high-level schematic outling the controller manager is given below, further details can also be found here:
In order to gain an understanding of the various components being installed it is worthwhile working through this section. If you are less concerned with understanding individual software dependencies and their function using the automated install script is more time efficient.
Booting with Ubuntu 22.04
We will install Ubuntu 22.04 through flashing a USB with Ubuntu 22.04 and using this flased USB drive as the install medium.
You may use the following application to flash a USB drive with the Ubuntu OS image. Download this application on a device other than the laptop/workstation as we don’t want to include any unnecessary applications on this device. Follow the official Ubuntu Installation guide to set up the USB flashdrive and install the Ubuntu OS (22.04).
When installing Ubuntu, set the computer password robot and enable the Log in automatically setting.
Ubuntu Pro Token
In order to simplify the process of performing a RT patch of the Ubuntu Kernel we leverage Ubuntu Pro. Generate an Ubuntu Pro token through following the section 3 called “Get your free Ubuntu pro subscription” from the following guide. We will use this token to activate Ubuntu pro and activate an RT patched kernel on our machine.
Cloning Codebase
To clone the codebase including submodule dependencies run:
git clone git@github.com:droid-dataset/droid.git
cd droid
git submodule update --init --recursive
Configure Parameters
Complete the following parameters in ./droid/misc/parameters.py.
-
Start by specifying static IP addresses for all the machines on the platform (NUC, laptop, control unit).
-
Add the sudo password for the machine you are using (only relevant for the NUC machine).
-
Set the type and serial number of your robot. The serial number for your robot can be found on the control box unit.
-
If this is your first time setting up the platform you can ignore the camera ids as you will need to load the GUI to generate these.
-
Set the Charuco board parameters to match the board you are using.
-
Provide an Ubuntu Pro token (required to automate rt-patch of kernel on the NUC).
Complete the following parameters in ./config/<robot_type>/franka_hardware.yaml
- Specify the
robot_ipparameter.
Run Setup Script
To complete the device setup execute the setup script with elevated privileges through running the following:
sudo ./scripts/setup/nuc_setup.sh
Configuring the Laptop/Workstation
The laptop/workstation device manages the execution of the Oculus Quest application, camera data and user client code including a GUI application. Recalling the Polymetis diagram from earlier, all the user client code is run on this device.
Booting with Ubuntu 22.04
We will install Ubuntu 22.04 through flashing a USB with Ubuntu 22.04 and using this flased USB drive as the install medium.
You may use the following application to flash a USB drive with the Ubuntu OS image. Download this application on a device other than the laptop/workstation as we don’t want to include any unnecessary applications on this device. Follow the official Ubuntu Installation guide to set up the USB flashdrive and install the Ubuntu OS (22.04).
When installing Ubuntu, set the computer password robot and enable the Log in automatically setting.
Cloning Codebase
To clone the codebase including submodule dependencies run:
git clone git@github.com:droid-dataset/droid.git
cd droid
git submodule update --init --recursive
Configure Parameters
Complete the following parameters in ./droid/misc/parameters.py.
-
Specify static IP addresses for all the machines on the platform (NUC, laptop, control unit).
-
Add the sudo password for the machine you are using (only relevant for the NUC machine).
-
Set the type and serial number of your robot. The serial number for your robot can be found on the control box unit.
-
If this is your first time setting up the platform you can ignore the camera ids as you will need to load the GUI to generate these.
-
Set the Charuco board parameters to match the board you are using.
-
Provide an Ubuntu Pro token (required to automate rt-patch of kernel on the NUC).
Complete the following parameters in ./config/<robot_type>/franka_hardware.yaml
- Specify the
robot_ipparameter.
Run Setup Script
To complete the device setup execute the setup script with elevated privileges through running the following:
sudo ./scripts/setup/laptop_setup.sh
Testing/Validating Entire Setup
In order to validate your device setup we will attempt to collect a trajectory. Start by running the NUC server machine through running the corresponding Docker container. This can be accomplished through running the setup script which spins the control server container. Alternatively you may run the container directly with the below command.
cd .docker/nuc
docker compose -f docker-compose-nuc.yaml up
Note: you want to ensure environment variables defined in the docker compose file are exported for them to be available to the container:
Next run the test script for collecting a trajectory on the laptop through running the test Docker container:
cd .docker/laptop
docker compose -f docker-compose-laptop.yaml run laptop_setup python scripts/test/collect_trajectory.py
Note: you want to ensure environment variables defined in the docker compose file are exported for them to be available to the container: