This guide commences with outlining the configuration of your Franka robot arm. Following this we detail the configuration of the Oculus Quest. We then outline the software setup for the NUC which interfaces directly with the Franka control unit and finally the laptop which runs the GUI application and client software.
Table of contents
Configuring the Franka robot
Franka World Account
A Franka World account is used to manage Franka robot arms and associated firmware updates. You may login to Franka World or register and account at the following portal.
Thankfully Franka Robotics have provided a tutorial on registering and synchronizing software for your Franka robot on Franka World. Please follow this tutorial to set up your robot arm:
Importantly, after the above tutorial, it is necessary to ensure that the Franka Control Interface (FCI) feature is installed on your robot. Further information on this interface which Franka Robotics expose is found in the guide below:
Operating the Robot
Please refer to the Franka Robotics Getting Started Guide to perform the initial setup and operation of your robot arm. At this point it is worthwhile noting the details of how to activate and deactivate FCI for your robot, these details can be found here.
Updating Inertia Parameters for Robotiq Gripper
In order to accurately represent the robot model with the Robotiq gripper we need to update the end-effector configuration. From the Desk UI you may access this option under Settings > End-Effector as outlined here.
Please add the following configuration file via the UI.
Configuring the Oculus Quest
The Oculus will be used to run an application that tracks the pose of hand-held controllers which we use to teleoperate the robot.
The first step to setting up your Oculus Quest is to associate a Meta account with the device. You may create an account at the following portal. Once you’ve created a Meta account you also need to register as a Meta developer, a guide for accomplishing this can be found here.
Once you have a meta developer account, you are ready to begin enabling developer mode on your Oculus device. Developer mode is required to run a custom application for the Oculus Quest which we use as part of the DROID platform. For instructions on enabling developer mode on your Oculus device please see the following guide.
Later in this guide we will detail how to run the required application on the Oculus, for now the device setup is complete.
Configuring the NUC
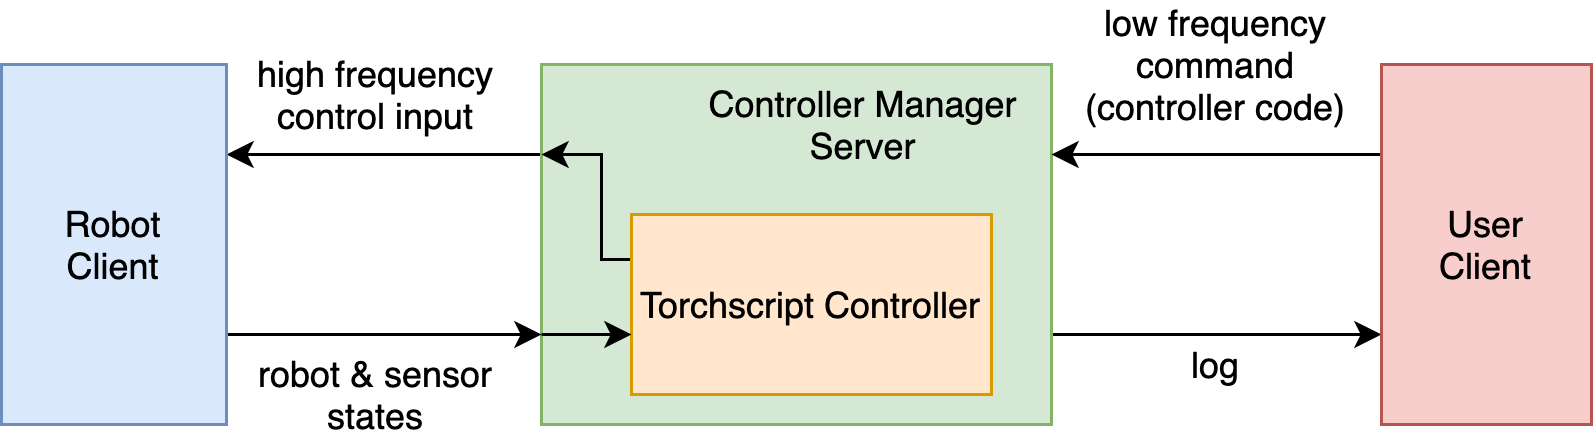
The NUC device is used to run the polymetis controller manager server. This server manages translating commands from the user client to the robot client. A high-level schematic outling the controller manager is given below, further details can also be found here:
Booting with Ubuntu 18.04
We will install Ubuntu 18.04 through flashing a USB with Ubuntu 18.04 and using this flased USB drive as the install medium.
You may use the following application to flash a USB drive with the Ubuntu OS image. Download this application on a device other than the NUC as we don’t want to include any unnecessary applications on the NUC (e.g. personal laptop). Follow the official Ubuntu Installation guide to set up the USB flashdrive and install the Ubuntu OS (18.04) on the NUC.
When installing Ubuntu, set the computer password robot and enable the Log in automatically setting.
Configuring Static IP Address
To set the static IP for the NUC, enter Settings > Network and click the add wired connection option (through clicking the + option under the Wired heading). Click the IPv4 tab; under IPv4 method select manual. Set the Address to 172.16.0.2 and the netmask to 255.255.255.0. Click apply to create this static IP address.
Performing RT Patch of Kernel
In order to ensure that real-time priorities set in the libfranka codebase are respected we need to perform a Real-Time (RT) patch of the default kernel. For this section we will be following the official guide provided by Franka Robotics.
To ensure, you replicate the same setup as the original DROID platform implementation start by installing dependencies with:
sudo apt-get install build-essential bc curl ca-certificates gnupg2 libssl-dev lsb-release libelf-dev bison flex dwarves zstd libncurses-dev
Following the installation of dependencies, install a kernel patch that has been tested with the DROID platform:
curl -SLO [https://mirrors.edge.kernel.org/pub/linux/kernel/v5.x/linux-5.4.70.tar.xz](https://mirrors.edge.kernel.org/pub/linux/kernel/v5.x/linux-5.4.70.tar.xz)
curl -SLO [https://mirrors.edge.kernel.org/pub/linux/kernel/projects/rt/5.4/older/patch-5.4.70-rt40.patch.xz](https://mirrors.edge.kernel.org/pub/linux/kernel/projects/rt/5.4/older/patch-5.4.70-rt40.patch.xz)
xz -d *.xz
Follow the official Franka Robotics guide from the Compiling the kernel section onwards, using the kernel patch that was installed above.
CPU Frequency Scaling
Most CPUs are by default configured to use a lower operating frequency, we wish to override this setting in order to increase the operating frequenecy and as a result reduce the latency when interfacing with libfranka. Follow this section of the official Franka Robotics guides to disable CPU frequency scaling.
Configuring Python Virtual Environment (Conda)
We will use Conda as the package manager for our python virtual environment. You can install Conda from the following link. Once you’ve installed Conda, ensure that you have configured git on the NUC so you can pull software packages from GitHub. A guide on configuring git is provided here.
Next, we will commence with setting up the Polymetis library. The following guide details how to build Polymetis, we will be following this guide.
The first step of the linked guide requires you to clone the fairo repository. We have included a pinned version of the library with the DROID main repository as a git submodule. Clone the DROID repository and submodules with the following command:
git clone git@github.com:droid-dataset/droid.git
# sync and pull submodules
git submodule sync
git submodule update --init --recursive
You should now find the fairo repository at droid/fairo, from this point continue with steps 2 and 3 of the polymetis guide.
In step 4, when building libfranka from source, it is crucial to fix the version of libfranka you are using to one that is compatible with the robot you are using, see the below table for a list of robot hardware and libfranka version compatibility:
| Robot | libfranka Version |
|---|---|
| Franka Emika Panda | 0.9.0 |
| Franka Research 3 | 0.10.0 |
In order to install a specific libfranka version (e.g. 0.10.0) using the linked guide, you can run the build_libfranka script as follows:
./scripts/build_libfranka.sh 0.10.0
When building the polymetis from source with CMAKE, be sure to set all setting to ON:
cmake .. -DCMAKE_BUILD_TYPE=Release -DBUILD_FRANKA=ON -DBUILD_TESTS=ON -DBUILD_DOCS=ON
make -j
Now that Polymetis is built, we will add other dependencies to our conda virtual environment.
Now that polymetis is built we will commence with installing the remaining dependencies for our python virtual environment. From the root directory of this repository, with the python virtual environment created during polymetis build activated run the following command to install remaining dependencies:
pip install -e .

# Done like this to avoid dependency issues
pip install dm-robotics-moma==0.5.0 --no-deps
pip install dm-robotics-transformations==0.5.0 --no-deps
pip install dm-robotics-agentflow==0.5.0 --no-deps
pip install dm-robotics-geometry==0.5.0 --no-deps
pip install dm-robotics-manipulation==0.5.0 --no-deps
pip install dm-robotics-controllers==0.5.0 --no-deps
The next step is to ensure the the project config files reference the robot you are using. First we will update the robot client config file and after this we will update the robot model config file. Please find links to the required config files below:
| Robot | Config Files |
|---|---|
| Franka Emika Panda | config files |
| Franka Research 3 | config files |
We will start by updating the robot client config file. To do so go into fairo/polymetis/polymetis/conf/robot_client and delete the existing franka_hardware.yaml file. Replace this file with franka_hardware[robot_name].yaml from the linked config files folder. Rename this file to franka_hardware.yaml. Finally, edit this franka_hardware.yaml file and replace executable_cfg.robot_ip to match you Franka control box’s IP address.
Next we will update the robot model config file. To do so go into fairo/polymetis/polymetis/conf/robot_model and delete the existing franka_panda.yaml file. Replace this file with franka_panda[robot_name].yaml from the linked config files folder. Rename this file to franka_panda.yaml.
Update the IP parameters in droid/misc/parameters.py, in particular set robot_ip to match the IP address of your robot and nuc_ip to match the IP address of your NUC. Also set the sudo_password to match your machine’s sudo password (sudo access is required to launch the robot). Finally update the robot_type parameter to panda or fr3 depending on which robot you are using.
If you choose to install miniconda instead of anaconda in previous steps of this guide you will need to make the following edits:
In droid/franka change the word anaconda to minicode in the scripts launch_gripper.sh and launch_robot.sh. Also change the paths to be absolute. Repeat for the launch_server.sh file in scripts/server
Optional: Configure Headless Server
When you have validated your entire setup you may wish to make the NUC a headless server such that you don’t need to manually run commands to start the control server.
From the terminal enter crontab -e and add the ollowing line to the bottom of the file:
@reboot bash [YOUR PATH TO DROID]/scripts/server/launch_server.sh
You may remove any displays associated with your NUC once you have configured it to run as a headless server.
Configuring the Laptop/Workstation
The laptop/workstation device manages the execution of the Oculus Quest application, camera data and user client code including a GUI application. Recalling the Polymetis diagram from earlier, all the user client code is run on this device.
Booting with Ubuntu 22.04
We will install Ubuntu 22.04 through flashing a USB with Ubuntu 22.04 and using this flased USB drive as the install medium.
You may use the following application to flash a USB drive with the Ubuntu OS image. Download this application on a device other than the laptop/workstation as we don’t want to include any unnecessary applications on this device. Follow the official Ubuntu Installation guide to set up the USB flashdrive and install the Ubuntu OS (22.04).
When installing Ubuntu, set the computer password robot and enable the Log in automatically setting.
Configuring Static IP Address
To set the static IP for the laptop, enter Settings > Network and click the add wired connection option (through clicking the + option under the Wired heading). Click the IPv4 tab; under IPv4 method select manual. Set the Address to 172.16.0.1 and the netmask to 255.255.255.0. Click apply to create this static IP address.
Configuring Python Virtual Environment (Conda)
We will use Conda as the package manager for our python virtual environment. You can install Conda from the following link. Once you’ve installed Conda, ensure that you have configured git on the NUC so you can pull software packages from GitHub. A guide on configuring git is provided here.
Clone the DROID repository and submodules with the following command:
git clone git@github.com:droid-dataset/droid.git
git submodule sync
git submodule update --init --recursive
Next create and activate a conda environment called robot with python 3.7 through running the following commands:
conda create -n "robot" python=3.7
conda activate robot
Ensure that GCC is installed through running the following commands:
sudo apt update
sudo apt install build-essential
Verify your installation through running (you should observe a version returned):
gcc --version
Next we will install the ZED SDK and python API which is required to interface with ZED cameras. Follow the official guide outlined here, while adhering to the below instructions during your installation:
- Ensure you have the robot conda environment activated
- Enter yes when prompted to install CUDA
- Enter yes to everything else during the installation procedure with the exception of optimizing ZED models this is optiona
Once you have restarted your machine post installation, activate the robot conda environment and test that you can import pyzed through running:
python -c "import pyzed"
The software for the Oculus application is included under droid/oculus_reader as a git submodule. Start by installing the oculus reader dependencies into the current virtual environment through running:
pip install -e ./droid/oculus_reader
Next, install the android debug bridge software dependency required to interface with your Oculus Quest through running:
sudo apt install android-tools-adb
Finally from the root directory of the project repository, with the python virtual environment activated run the following command to install remaining dependencies:
pip install -e .

# Done like this to avoid dependency issues
pip install dm-robotics-moma==0.5.0 --no-deps
pip install dm-robotics-transformations==0.5.0 --no-deps
pip install dm-robotics-agentflow==0.5.0 --no-deps
pip install dm-robotics-geometry==0.5.0 --no-deps
pip install dm-robotics-manipulation==0.5.0 --no-deps
pip install dm-robotics-controllers==0.5.0 --no-deps
Update the IP parameters in droid/misc/parameters.py, in particular set robot_ip to match the IP address of your robot and nuc_ip to match the IP address of your NUC. In addition, set the robot_serial_number to match your robot’s serial number (found on your franka website, under Settings -> Franka World -> Control S/N). For the robot_type variable, enter ‘fr3’ or ‘panda’ depending on which Franka robot you are using. Update the Charuco board parameters to match the board you are using. Finally you will need to set the camera ids in this parameters file further details on how to accomplish this are provided later in the guide.
If you choose to install miniconda instead of anaconda in previous steps of this guide you will need to make the following edits:
In droid/franka change the word anaconda to minicode in the scripts launch_gripper.sh and launch_robot.sh. Also change the paths to be absolute. Repeat for the launch_server.sh file in scripts/server
Testing/Validating Entire Setup
In order to validate your device setup we will attempt to collect a trajectory. Start by running the NUC server machine through running the following commands:
conda activate polymetis-local
python scripts/server/run_server.py
With the control server running on the NUC, run the script for testing trajectory collection with:
conda activate robot
python scripts/test/collect_trajectory.py